Transport Adding & TA Bills Monitoring
⇉ What Will We Cover ?
- Transport Adding
- TA Approve & reject
- Supportive Documents Check
- Bulk Approve or Reject
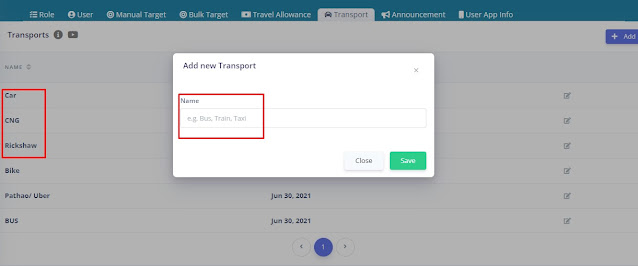
Transport adding means to add the vehicle which users normally use while traveling to ensure his duty.
 |
| Image 1 |
- Go to Transport Panel
- Click on Add
- Enter Vehicle Name & click on SAVE. Then the vehicle will be added which will appear on Mobile App while selecting transport to make TA
- You can edit the names as well by click on Update.
 |
| Image 2 |
- Click on Travel Allowance.
- You can use filter as mentioned on Image 2 by User Wise, Code Wise, Date Wise , Territory Wise, even Amount Wise as well.
- Make sure to click on Done after making any filtration.
If you want to approve the TA ,
 |
| Image 3 |
- Click on right sign. Then you can see Approve. If you click on Approve, the status for this specific TA will be changed for approved.
- You can add comments/remarks as well if you want to.
If you want to reject the TA ,
 |
| Image 4 |
- Click on round cross of a specific TA. You can see reject. If you click on Reject , then the status will be changed as Rejected.
- You can type the reason for rejection as well on Remarks box.
| Image 5 |
- You can check the images of supportive documents [ Example : Bus Tickets ] by clicking on Images. It will help you to make decision for accepting and rejecting.
You can approve or reject all TA at a single click if you want to. But It is wise to check the TA one by one.
 |
| Image 6 |
- Click on left box of Name Column.
- You can see that 15 TA's have been selected at a time.
- If you want to select all, then please click on select all items.
- Click on Bulk Action. You can see Approve & Rejection popup.
- The status will be changed as your click.
Note: Please make filter on user wise and date wise to approve or reject.
Comments
Post a Comment